From Trash to Treasure: 10 Thrift Store Furniture Flips Anyone Can Do This Weekend
You spotted something ugly at Goodwill last Saturday — a scratched-up dresser or a wobbly side table — and you walked right past it. But here’s the thing: thrift store furniture flips are exactly how people are turning $8 finds into $200-looking statement pieces. These aren’t complicated woodworking projects. They’re weekend wins that cost almost nothing, look incredible on Pinterest, and make your home feel like you hired a decorator on a student budget.
Let’s get into it.
1. The Chalk Paint Dresser Glow-Up (Classic Thrift Store Furniture Flip)
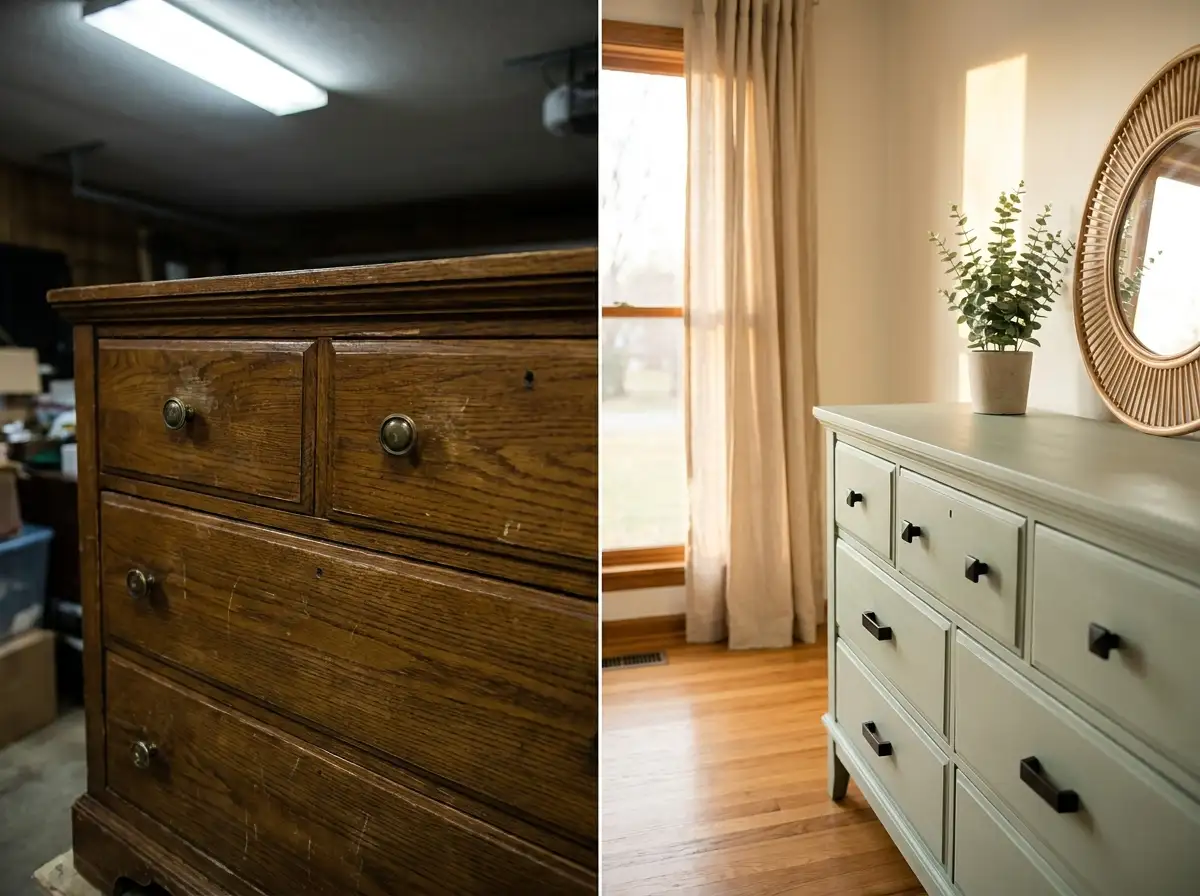
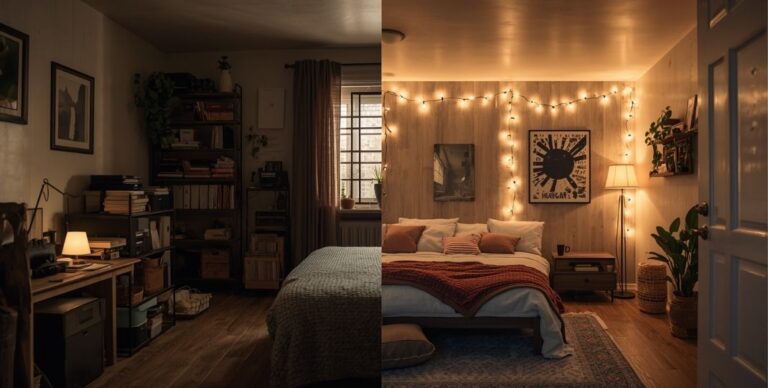
If you’ve never tried thrift store furniture flips before, this is where you start. A beat-up wooden dresser — even one with chipped veneer and outdated hardware — is honestly the perfect canvas. Chalk paint is forgiving, it bonds to almost any surface without sanding, and the matte finish photographs beautifully. Swap in some vintage brass or matte black drawer pulls and suddenly you’ve got a piece that looks straight out of a boutique home store. People are selling these restyled dressers for $150–$300 on Facebook Marketplace after picking them up for $15 at the thrift store. The best part? You can do the whole thing in an afternoon.
[Image: Before and after of a thrift store wooden dresser painted in sage green chalk paint with new matte black hardware on a light wood floor. Alt text: thrift store furniture flip before and after sage green chalk paint dresser with matte black hardware DIY home decor]
💡 Related: If you love transforming your space on a budget, check out our guide to DIY Aesthetic Room Decor Ideas for more budget-friendly inspo.
Materials Needed
- Chalk paint (any brand — Annie Sloan, Rust-Oleum Chalked, or a budget dupe)
- Flat paintbrush or foam roller
- New drawer pulls or knobs
- Screwdriver
- Optional: clear wax or matte topcoat for sealing
Step-by-Step Tutorial
- Wipe down the dresser with a damp cloth to remove dust and grime.
- Apply your first coat of chalk paint — don’t worry about streaks, that’s part of the charm.
- Let dry for 1–2 hours, then apply a second coat for full coverage.
- Optional: lightly sand edges for a distressed look once dry.
- Seal with clear wax or a matte topcoat.
- Swap out the old hardware for your new pulls using a screwdriver.
| Estimated Cost | Time Required | Difficulty Level |
|---|---|---|
| $20–$40 total | 3–4 hours (including dry time) | Beginner |
2. The $5 Side Table Flip with Contact Paper
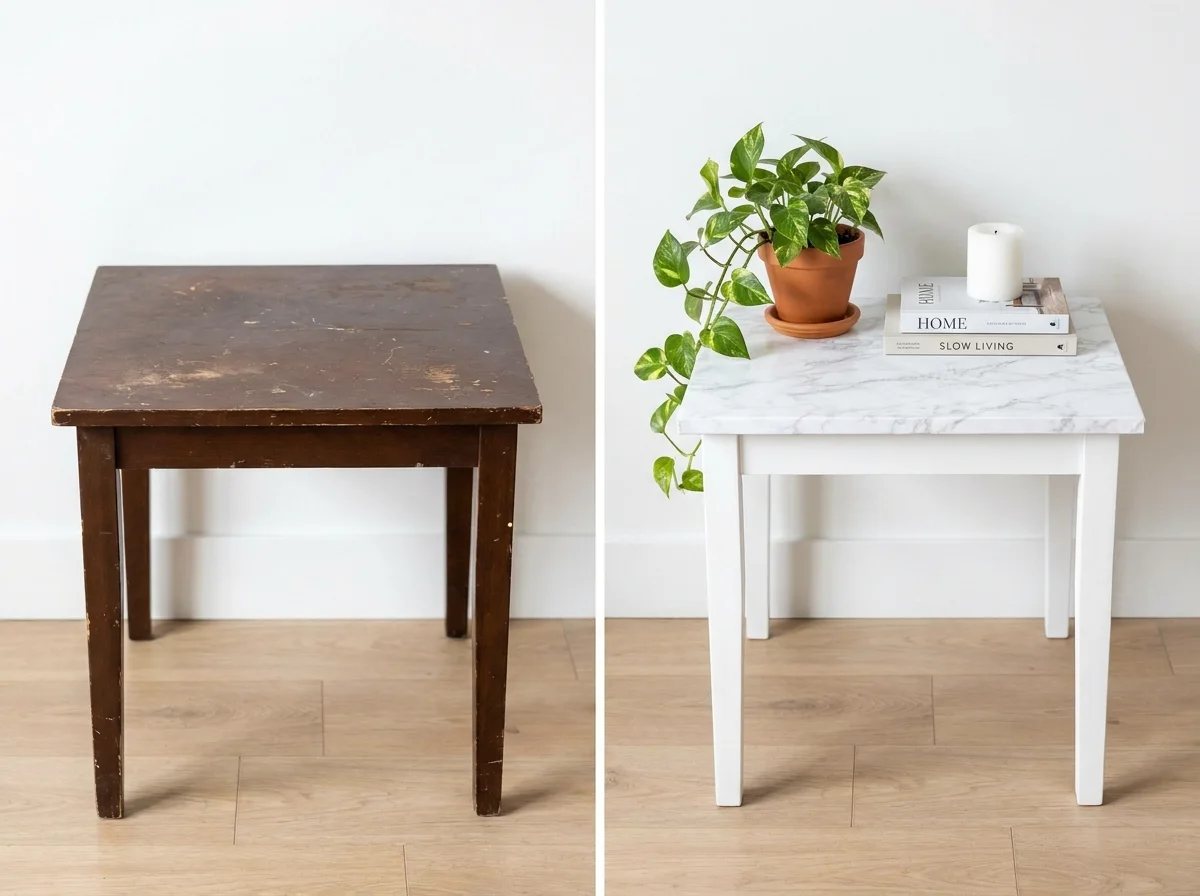
Side tables are the hidden gems of thrift store furniture flips. They’re small, they’re cheap (often $3–$8), and the transformation potential is wild. The trick here is using contact paper or adhesive vinyl on the tabletop combined with a quick coat of spray paint on the legs. You can go for a marble look, a rattan print, or even a bold color block. The result looks intentional and expensive, not like something you patched together on a Sunday afternoon. This is also a renter-friendly flip — no permanent changes, everything is removable.
[Image: Before and after of a thrifted wooden side table with white spray painted legs and marble-look contact paper on the tabletop styled with a small plant and candle. Alt text: thrift store furniture flip side table makeover with marble contact paper and white spray paint budget home decor DIY]
Materials Needed
- Spray paint (choose a satin or matte finish)
- Contact paper or adhesive vinyl in your desired pattern
- Scissors or craft knife
- Painter’s tape
- Squeegee or credit card for smoothing bubbles
Step-by-Step Tutorial
- Clean the table thoroughly and let dry completely.
- Tape off the tabletop to protect it while you spray paint the legs.
- Apply 2 light coats of spray paint to the legs, letting each coat dry 20 minutes.
- Measure and cut your contact paper to fit the tabletop exactly.
- Peel and apply slowly from one end, smoothing bubbles out with a squeegee.
- Trim any edges with a craft knife for a clean finish.
| Estimated Cost | Time Required | Difficulty Level |
|---|---|---|
| $10–$20 total | 1.5–2 hours | Beginner |
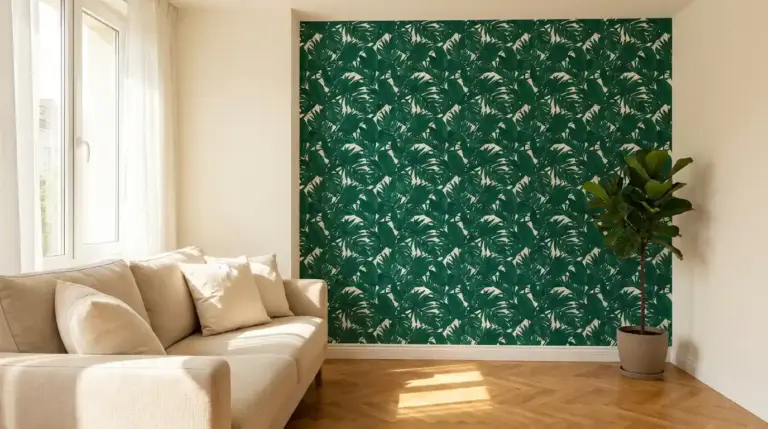
3. Laminate Bookshelf Makeover with Peel-and-Stick Wallpaper
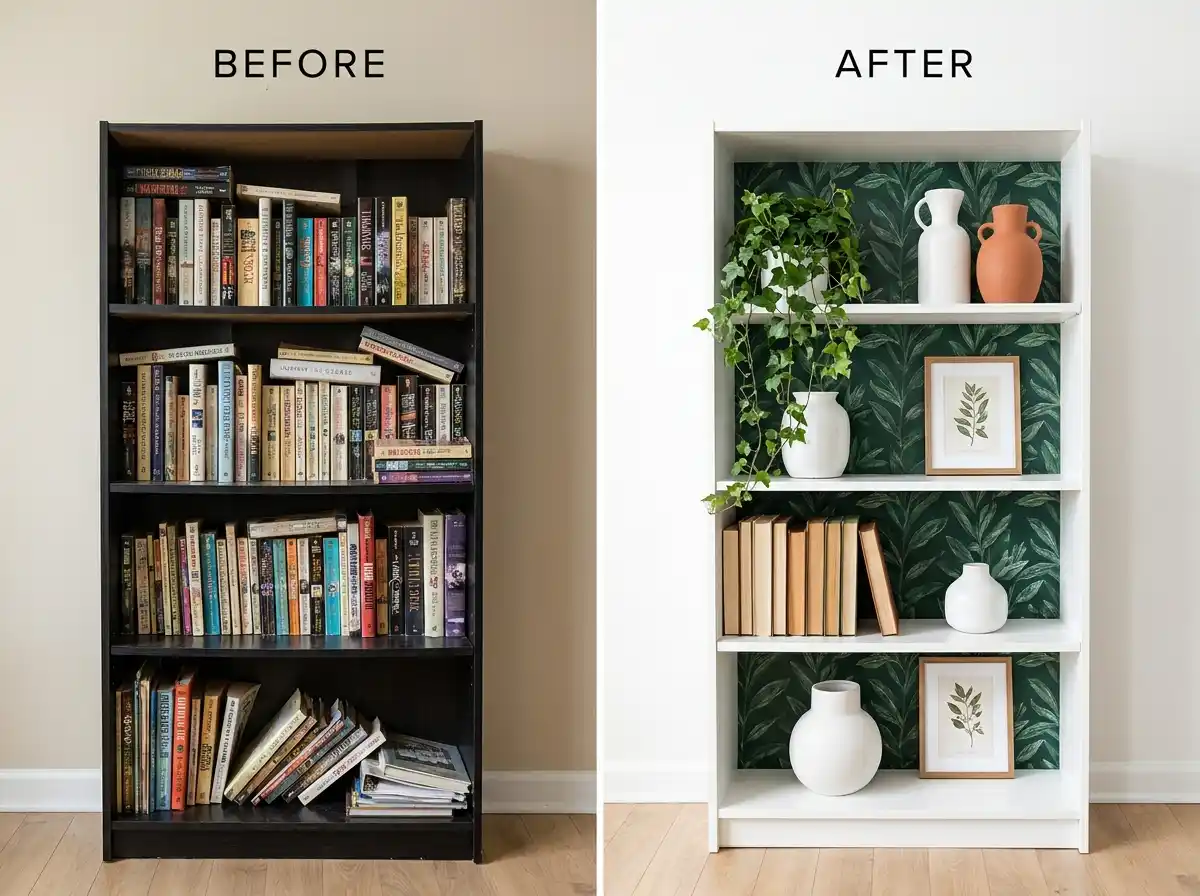
This is one of the most pinned thrift store furniture flips on the internet right now — and for good reason. Thrift stores are full of dark laminate bookshelves from the early 2000s that look heavy and dated. But line the back panels with peel-and-stick wallpaper and paint the exterior a light neutral? That thing goes from dumpster-worthy to living room centerpiece. The wallpaper backing adds a pop of color or pattern that draws the eye in, making even sparse shelves look styled and curated. It’s a small change with a seriously outsized visual impact.
[Image: Before and after of a dark laminate bookshelf with peel and stick wallpaper in a botanical green print applied to the back panels and exterior painted white styled with books and plants. Alt text: laminate bookshelf thrift store furniture flip with peel and stick wallpaper and white paint before and after budget home decor]
💡 Love this aesthetic? See how we pulled off a similar look in our 27 Small Living Room Ideas post.
Materials Needed
- Peel-and-stick wallpaper (measure your back panels before buying)
- Chalk paint or satin paint in your chosen color
- Foam roller
- Scissors and craft knife
- Level or measuring tape
Step-by-Step Tutorial
- Remove all shelves from the bookshelf.
- Paint the exterior and shelf surfaces with 2 coats of your chosen paint; let dry fully.
- Measure each back panel section individually (they’re rarely all exactly the same).
- Cut wallpaper strips to size.
- Apply starting from the top, smoothing downward to avoid bubbles.
- Trim edges cleanly with a craft knife.
- Reinstall shelves and style your new display.
| Estimated Cost | Time Required | Difficulty Level |
|---|---|---|
| $25–$50 total | 4–5 hours | Beginner–Intermediate |
4. Thrifted Chair Refresh: The Café Style Seat Flip

Wooden chairs are everywhere at thrift stores — usually $3–$10 each — and they’re one of the easiest furniture flip projects you can tackle. A simple repaint in a bold or moody color (think forest green, terracotta, or a deep navy) instantly gives them a whole new identity. Add a tied-on cushion or a seat pad in a complementary fabric and you’ve got something that feels very intentional, very café chic. These also make great desk chairs for a small bedroom or home office setup.
[Image: Before and after of a thrifted wooden dining chair painted in deep forest green with a linen seat cushion tied on, styled next to a small white desk. Alt text: thrift store furniture flip wooden chair painted forest green with cushion DIY café style home office decor]
💡 Styling a small space? Our Tiny Bedroom Ideas for Students post has tons of ideas that pair perfectly with this look.
Materials Needed
- Chalk paint or satin furniture paint
- Foam brush or small roller
- Fine-grit sandpaper (120 or 220 grit)
- Ready-made seat cushion with ties, or fabric + foam to DIY one
- Clear matte topcoat
Step-by-Step Tutorial
- Lightly sand the chair to rough up the surface for better paint adhesion.
- Wipe away dust with a tack cloth.
- Apply first coat of paint — use a brush for detail areas and a foam roller for flat surfaces.
- Let dry 1–2 hours, then apply a second coat.
- Seal with matte topcoat once fully dry.
- Attach your cushion using ties or velcro strips.
| Estimated Cost | Time Required | Difficulty Level |
|---|---|---|
| $15–$30 total | 2–3 hours | Beginner |
5. Coffee Table Upgrade with Gel Stain (Farmhouse Furniture Flip)
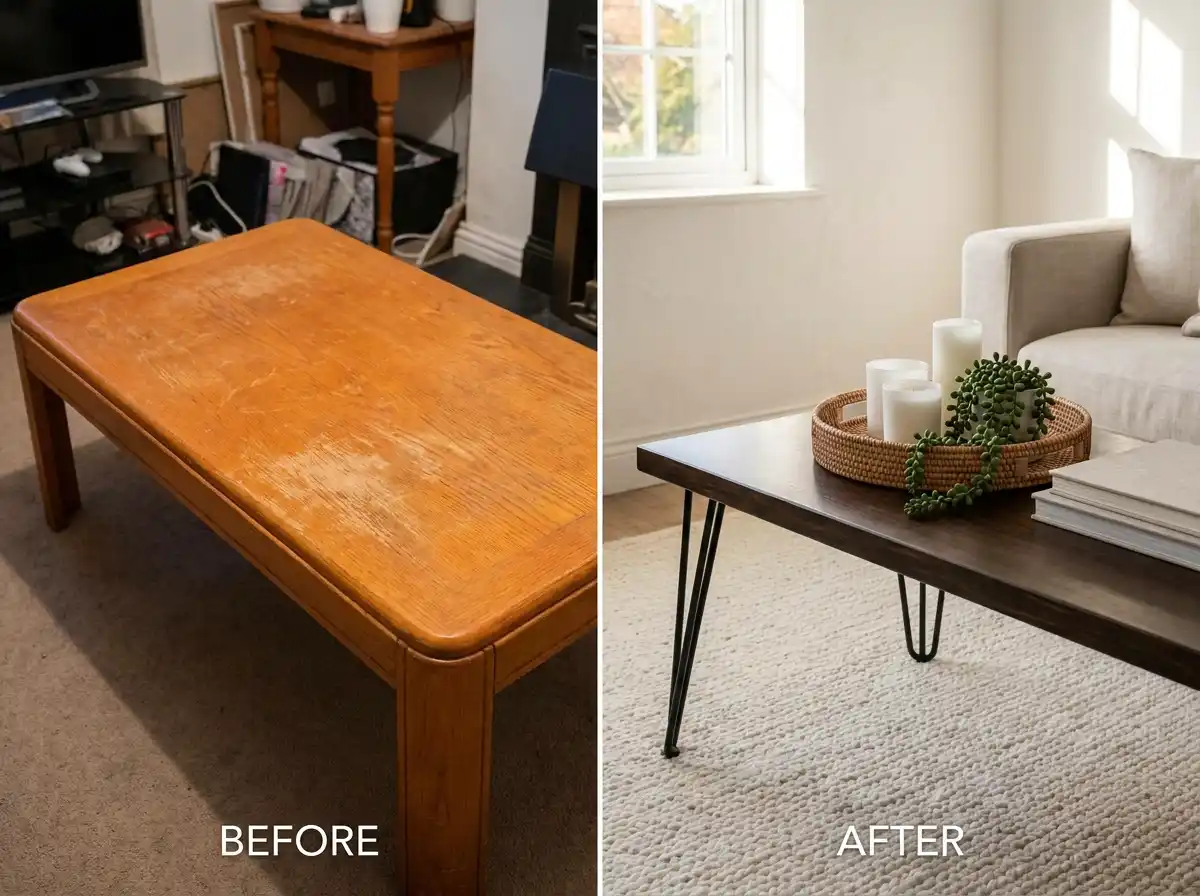
Scratched-up wooden coffee tables are one of the most underrated thrift store furniture flips you can do. The structure is usually solid — it’s just the finish that’s destroyed. Gel stain is your best friend here. Unlike regular wood stain, gel stain sits on top of the wood rather than soaking in, which means it works even on surfaces with old varnish still on them (with a light sand). The transformation from orange-toned 90s wood to a rich walnut or warm espresso is genuinely jaw-dropping. Add some hairpin legs if the existing ones are rough and you’ve got a piece that looks straight out of a West Elm catalog.
[Image: Before and after of a scratched thrift store wooden coffee table refinished with dark walnut gel stain and new black hairpin legs styled with a tray and candles on a neutral rug. Alt text: thrift store coffee table furniture flip with dark walnut gel stain and hairpin legs farmhouse DIY home decor before and after]
Materials Needed
- Gel stain (Minwax Gel Stain is widely available)
- Fine-grit sandpaper (150 and 220 grit)
- Clean rags or foam applicator
- Polyurethane topcoat (satin or matte)
- Optional: replacement hairpin legs and hardware
Step-by-Step Tutorial
- Lightly sand the entire surface with 150-grit sandpaper to dull the existing finish.
- Wipe away all dust with a tack cloth.
- Apply gel stain with a clean rag using circular motions, working in small sections.
- Wipe off excess stain with a clean rag after 3–5 minutes.
- Let dry fully (6–8 hours or overnight).
- Apply a second coat for a deeper, richer color if desired.
- Seal with 2 coats of polyurethane, sanding lightly between coats.
- If replacing legs, flip the table and swap them out last.
| Estimated Cost | Time Required | Difficulty Level |
|---|---|---|
| $30–$55 total | 1 day (with dry time) | Intermediate |
6. Old Armoire to Chic Wardrobe — One of the Boldest Thrift Store Furniture Flips
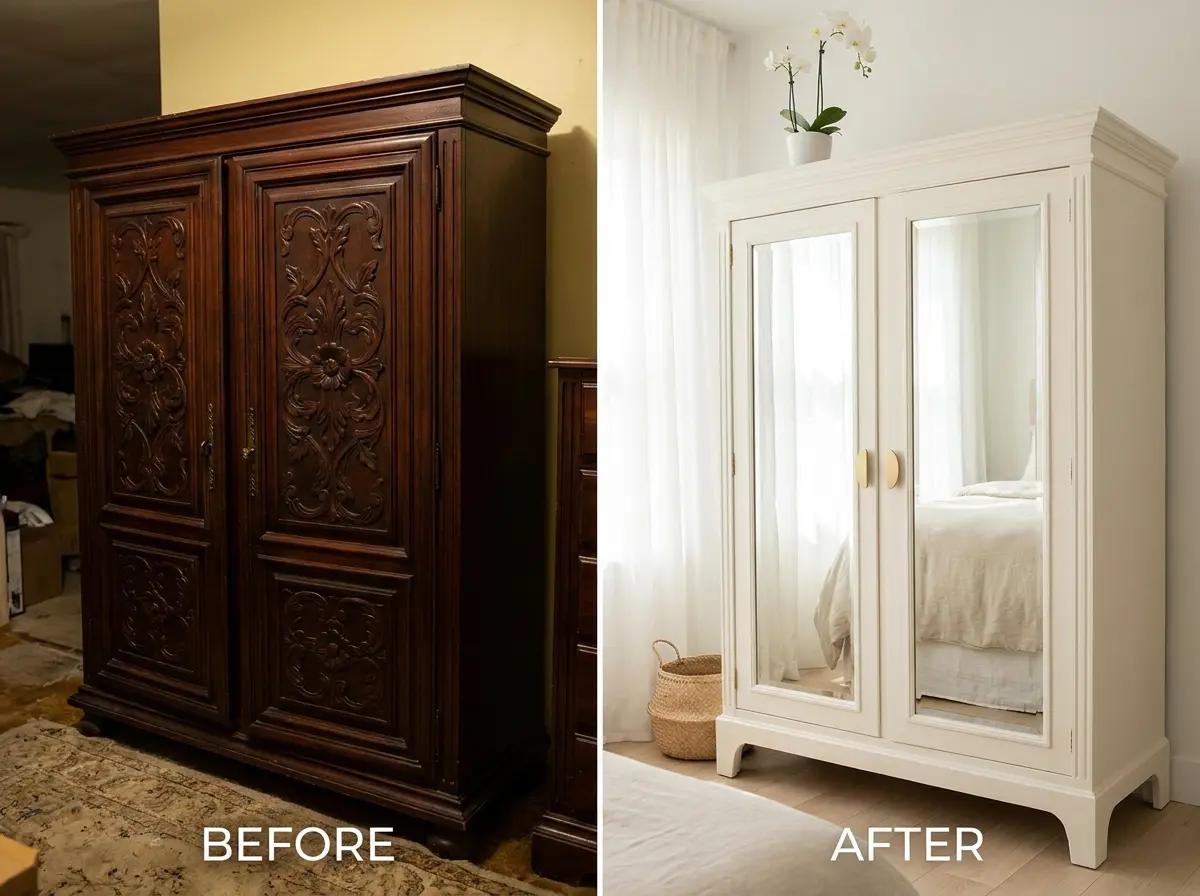
Large armoires show up at thrift stores all the time, usually because they’re heavy, dark, and nobody knows what to do with them. But this is one of those thrift store furniture flips that truly earns its “wow” factor. A full repaint in a soft white, warm cream, or even a dark sage — plus swapping door panels for framed mirrors — turns a dated beast of a piece into a stunning wardrobe that would cost $600+ new. Use it in a bedroom as a wardrobe, or in a hallway as a storage cabinet. Either way, people will ask where you bought it.
[Image: Before and after of a large dark wood thrift store armoire painted soft white with mirror panels installed in the doors and new gold hardware styled in a bedroom. Alt text: thrift store armoire furniture flip painted white with mirror panels and gold hardware DIY bedroom wardrobe makeover before and after]
Materials Needed
- Primer (Zinsser BIN or similar)
- Satin or semi-gloss furniture paint
- Mirror panels cut to fit door openings (most hardware stores cut to size)
- Mirror adhesive or panel clips
- New hardware (knobs or pulls)
- Foam roller and angled brush
Step-by-Step Tutorial
- Remove doors and hardware; set aside.
- Clean the entire piece thoroughly.
- Apply one coat of primer; let dry completely (this step is critical for a smooth finish).
- Apply 2 coats of your chosen furniture paint; let each coat dry fully.
- If removing door panels: carefully cut out or pop out the existing recessed panels.
- Adhere mirror panels using mirror adhesive or install with panel clips.
- Reinstall doors, attach new hardware.
- Touch up any areas as needed.
| Estimated Cost | Time Required | Difficulty Level |
|---|---|---|
| $60–$100 total | Full weekend | Intermediate |
7. Brass Mirror Frame Makeover — A 10-Minute Thrift Store Furniture Flip
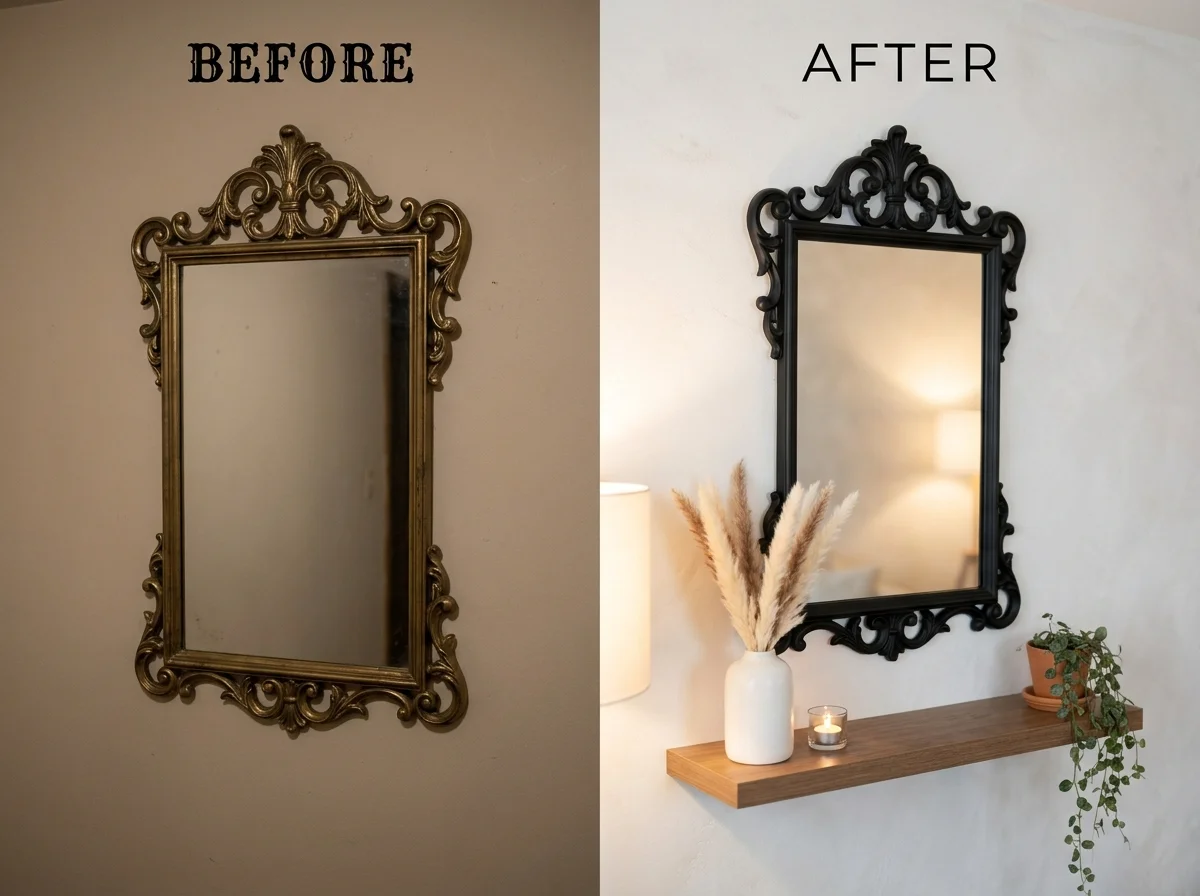
This might be the fastest thrift store furniture flip on this list, and it’s definitely the one with the most dramatic before-and-after ratio. Those old ornate brass-framed mirrors that were everywhere in the 80s and 90s? They’re at every thrift store, usually $5–$15. All you need is a can of matte or satin spray paint in black, white, or a warm champagne to bring them completely up to date. No prep required beyond a light clean. The whole thing takes about 20 minutes of actual work. The result looks like a $150+ piece from a boutique home décor shop.
[Image: Before and after of a thrift store ornate brass framed mirror spray painted matte black styled against a white wall with a small shelf and candle. Alt text: thrift store brass mirror furniture flip spray painted matte black DIY budget home decor before and after wall mirror makeover]
💡 See how mirrors can transform a room in our 27 Small Living Room Ideas guide.
Materials Needed
- Matte or satin spray paint (Rust-Oleum is reliable)
- Drop cloth or newspaper
- Painter’s tape (to protect the glass)
- Cleaning cloth
Step-by-Step Tutorial
- Clean the frame with a damp cloth to remove dust and oils.
- Apply painter’s tape along the inner edge of the frame to protect the mirror glass.
- Lay the mirror flat on a drop cloth in a well-ventilated area.
- Apply 2–3 light coats of spray paint, holding the can 10–12 inches away.
- Let each coat dry for 15–20 minutes before applying the next.
- Remove painter’s tape carefully once fully dry.
- Hang and style!
| Estimated Cost | Time Required | Difficulty Level |
|---|---|---|
| $8–$15 total | 30–45 minutes | Total Beginner |
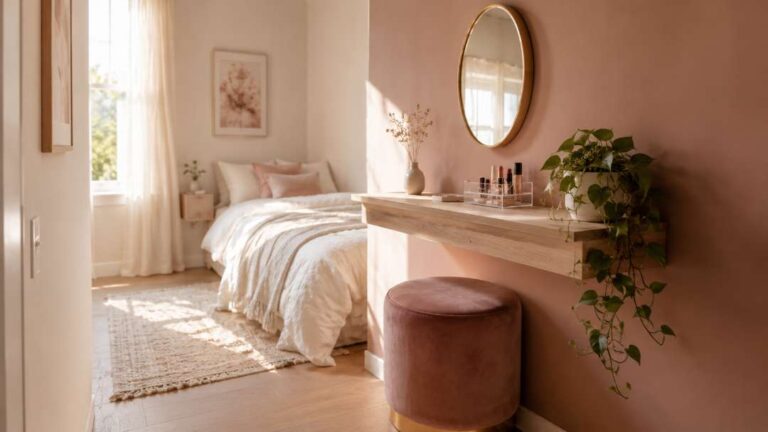
8. Nightstand Glow-Up with Fluted Panels — An Elevated Furniture Upcycle
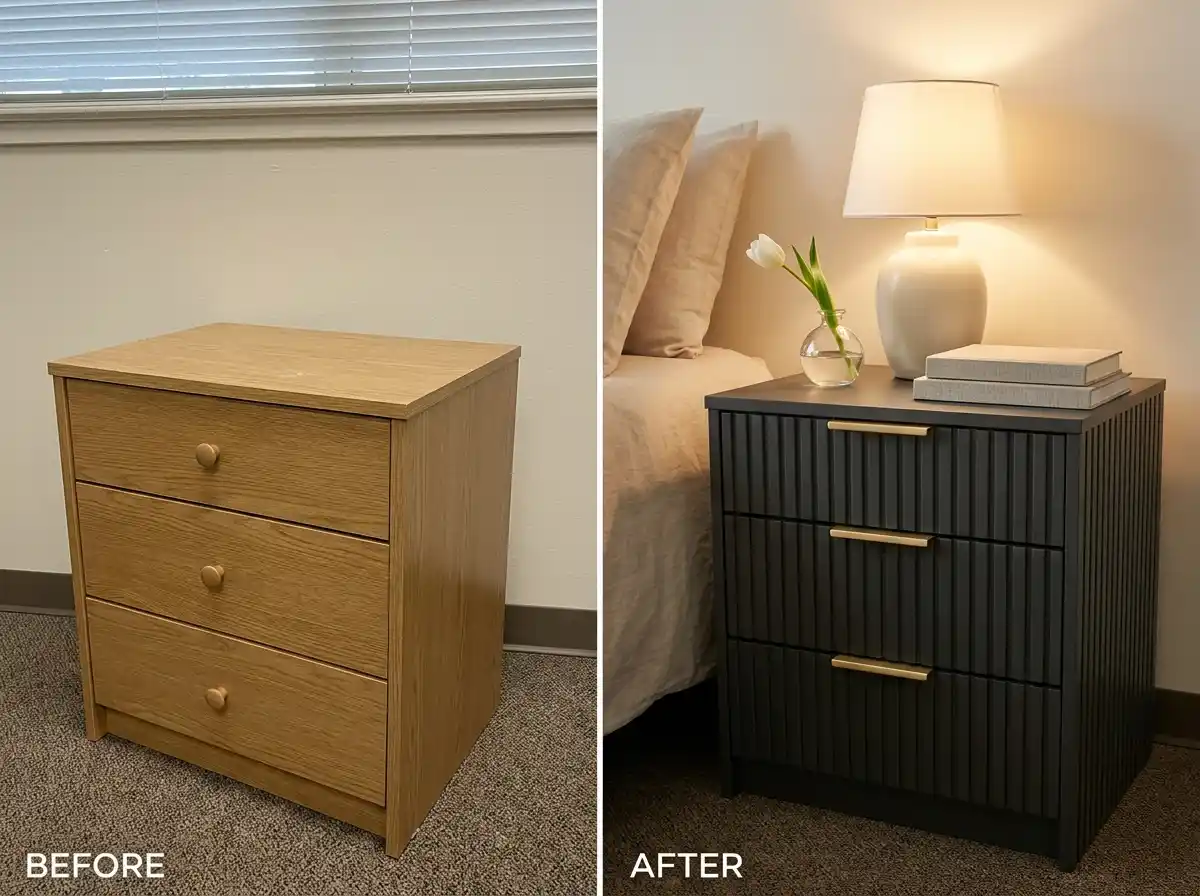
This is the thrift store furniture flip that goes viral. A plain boxy nightstand gets completely transformed by gluing thin fluted or grooved panels (also called reeded panels) to the drawer fronts and sides, then painting the whole thing in a deep color with gold hardware. The result looks like something from a high-end boutique hotel. Fluted panels are available in thin MDF strips at most hardware stores or online, and they cut with regular scissors or a craft knife. Combined with some statement gold pulls, this is genuinely one of those furniture flips where people don’t believe the before photo.
[Image: Before and after of a plain thrift store wooden nightstand with fluted MDF panels added to drawer fronts painted in deep charcoal with gold hardware styled with a lamp and plant. Alt text: thrift store nightstand furniture flip with fluted panels painted charcoal and gold hardware DIY luxury bedroom decor before and after]
💡 Need small bedroom styling help? Our Aesthetic Small Vanity Table Setup Ideas for Tiny Bedrooms post is right up your alley.
Materials Needed
- Fluted or reeded MDF wall panels (sold by the sheet at hardware stores)
- Craft knife or scissors
- Strong adhesive (Gorilla Glue or similar)
- Chalk paint or satin paint in a deep color
- Gold drawer pulls
- Screwdriver
Step-by-Step Tutorial
- Remove drawer pulls and measure each drawer front.
- Cut fluted panels to fit each drawer front using a craft knife.
- Apply adhesive to the back of each panel and press firmly onto drawer fronts.
- Let dry for at least 4 hours (overnight is better).
- Apply 2 coats of your chosen paint over the entire nightstand, including the panels.
- Let dry fully, then install new gold hardware.
- Optional: seal with a matte topcoat for durability.
| Estimated Cost | Time Required | Difficulty Level |
|---|---|---|
| $35–$60 total | 5–6 hours + overnight dry | Intermediate |
9. Bench Upholstery Flip — The Entryway Thrift Store Find That Earns Every Pin
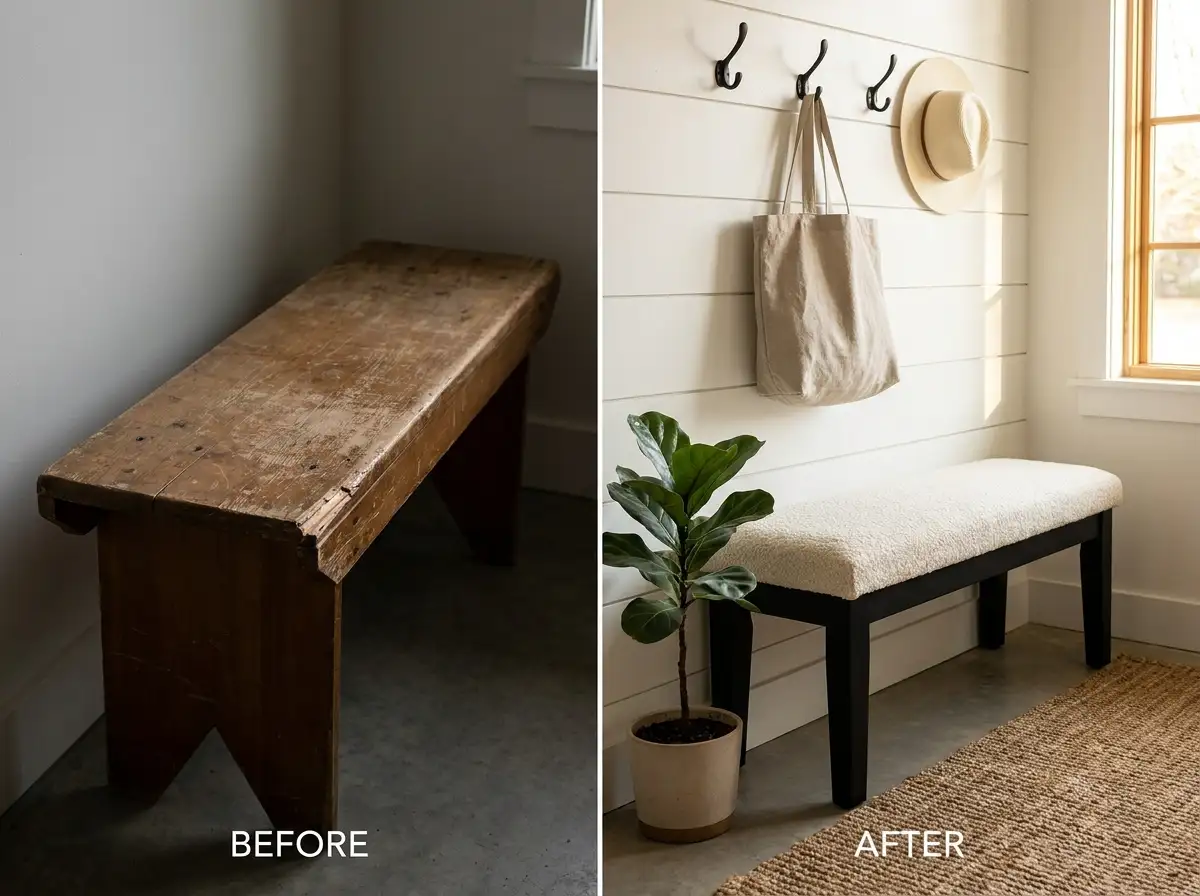
Wooden benches with flat seats are everywhere at thrift stores, often for under $10. They look rough, they’re scratched up, and the seat (if it has one) is usually sunken or stained. But this is one of those thrift store furniture flips that essentially teaches you a useful life skill: basic upholstery. You’re just wrapping a piece of foam in fabric and stapling it down. It takes about an hour, it costs next to nothing in extra materials, and you end up with an entryway bench that looks genuinely put together. Pair it with some hooks above and you’ve got a full entryway moment.
[Image: Before and after of a thrift store wooden bench with a freshly upholstered seat in a cream boucle fabric and painted black legs styled in an entryway with wall hooks and a small plant. Alt text: thrift store bench furniture flip with upholstered boucle seat and painted black legs DIY entryway decor before and after]
Materials Needed
- High-density foam (1.5–2 inch thickness, cut to seat size)
- Fabric of your choice (boucle, velvet, linen, or outdoor fabric)
- Staple gun and staples
- Scissors
- Sandpaper and paint for the legs
- Optional: batting for a softer look
Step-by-Step Tutorial
- Paint or restain the bench legs and frame in your chosen color; let dry.
- Cut foam to the size of the bench seat (most hardware stores will cut foam for you).
- Lay your fabric face-down on a flat surface.
- Place the foam on the fabric, then the bench seat on top of the foam.
- Pull the fabric tightly over one side and staple to the underside of the seat.
- Repeat on the opposite side, pulling taut. Then do the remaining two sides.
- Fold corners neatly (like wrapping a gift) and staple down.
- Reattach the seat to the bench frame.
| Estimated Cost | Time Required | Difficulty Level |
|---|---|---|
| $20–$40 total | 2–3 hours | Beginner–Intermediate |
10. Plastic Chair to Outdoor Statement Piece — The Most Underrated Thrift Store Furniture Flip
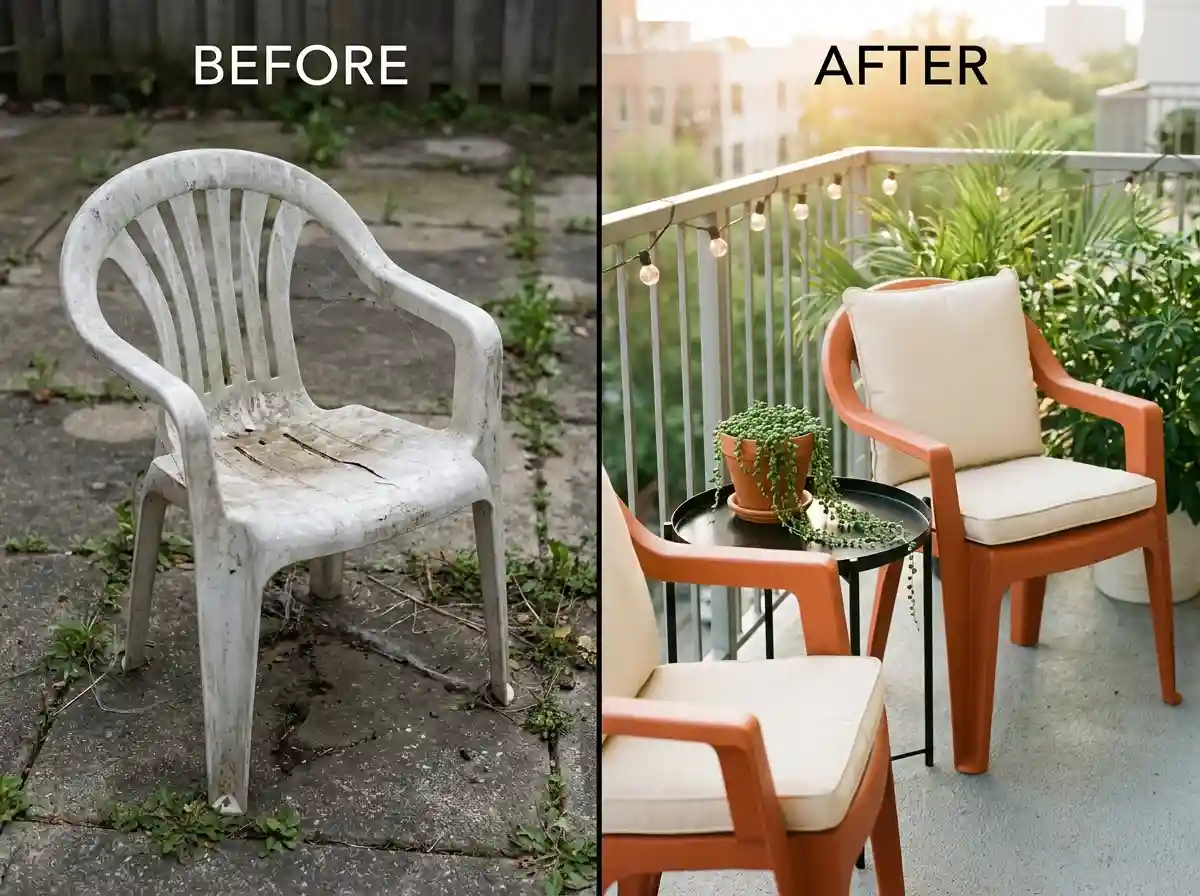
Most people walk right past plastic chairs at the thrift store. Don’t. With the right spray paint designed for plastic, you can turn a $2 resin chair into a gorgeous outdoor accent seat. The key is using a spray paint that specifically bonds to plastic (like Rust-Oleum 2X or Krylon Fusion). Add a weather-resistant cushion and a side table flip (see #2 above), and you’ve got a complete balcony or patio setup for under $30. This is one of the most budget-friendly thrift store furniture flips you can possibly do — and it works on plastic plant pots and small plastic tables too.
[Image: Before and after of thrift store white plastic resin chairs spray painted in terracotta orange with weather-resistant cushions styled on a small apartment balcony with plants. Alt text: thrift store plastic chair furniture flip spray painted terracotta with cushion outdoor balcony decor DIY budget before and after]
Styling a small outdoor space? You’ll love our Small Apartment Balcony Decor Ideas post for the perfect finishing touches.
Materials Needed
- Spray paint formulated for plastic (Rust-Oleum 2X or Krylon Fusion)
- Drop cloth
- Cleaning cloth and mild soap
- Weather-resistant outdoor cushion
Step-by-Step Tutorial
- Wash the chair thoroughly with soapy water to remove all dirt, mold, and oils.
- Let dry completely in the sun — any moisture will ruin the paint adhesion.
- Lay on a drop cloth in a well-ventilated area.
- Apply the first light coat of spray paint, holding 10–12 inches from the surface.
- Let dry 20–30 minutes, then apply a second coat.
- Apply a third coat if needed for full, even coverage.
- Let cure for 24 hours before sitting on or adding cushions.
| Estimated Cost | Time Required | Difficulty Level |
|---|---|---|
| $10–$25 total | 1–2 hours | Total Beginner |
Frequently Asked Questions About Furniture Flipping
What kind of furniture is easiest to flip from thrift stores?
Solid wood pieces are the gold standard for thrift store furniture flips because they paint and stain beautifully and last a long time. After that, look for simple shapes — side tables, nightstands, wooden chairs, and benches. Avoid pieces with broken joints, strong odors, or serious structural damage unless you’re confident in repairs.
Do I need to sand furniture before painting it?
Not always. Chalk paint and spray paint formulated for plastic both bond without heavy sanding. For gel staining or using regular latex paint, a light sand (120–150 grit) to rough up the surface is usually enough. The key step most beginners skip is cleaning the piece thoroughly before any paint goes on.
How do I find good furniture at thrift stores?
Go on weekdays if you can — that’s when most thrift stores restock from weekend donations. Look past the color and condition of the finish and focus on the bones of the piece: is it structurally solid? Does it wobble? Are the joints tight? A terrible paint job is easy to fix. A broken frame is not worth the effort for a beginner.
Can I make money doing thrift store furniture flips?
Absolutely. Many people start as a hobby and turn it into a side income selling on Facebook Marketplace, Craigslist, or Etsy. The key is keeping material costs low (under $40 per piece) and choosing pieces that have clear market demand — dressers, coffee tables, and nightstands sell the fastest. Pieces that photograph well in natural light also sell much faster.
What paint is best for furniture flipping?
Chalk paint is the most beginner-friendly option because it requires minimal prep and gives a beautiful matte finish. For a harder, more durable finish, choose a furniture-specific satin or semi-gloss paint (like Fusion Mineral Paint or Benjamin Moore Advance). For metal or plastic pieces, spray paint formulated for that specific material is the way to go.
Ready to hit the thrift store this weekend? Save this post to your Pinterest home decor board so you can reference it while you shop!