How to Style a Vampire Haircut for Wavy Hair at Home
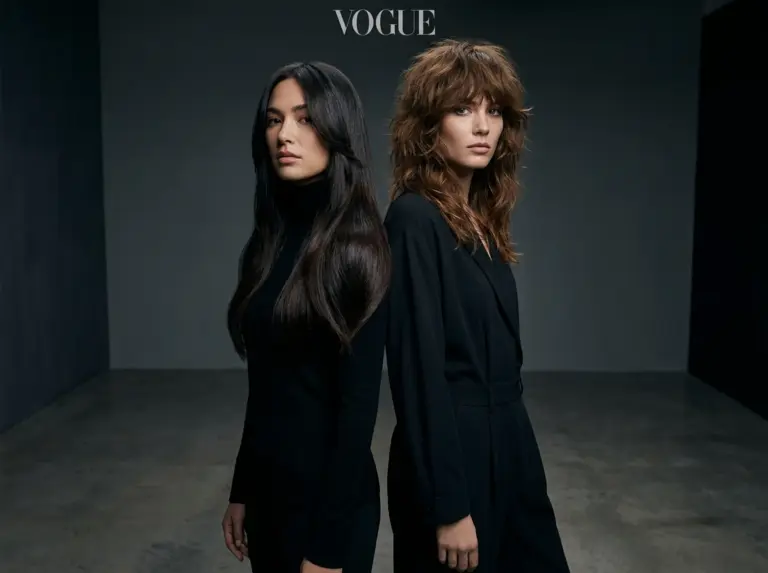
I remember the first time I saw a vampire haircut on a woman with thick, unruly waves — she looked like she’d just walked off a gothic runway. I also remember thinking, “there’s no way I can pull that off at home.” Spoiler: I was wrong, and so are you if you’re thinking the same thing right now.
If you’ve been searching for a cut that works with your natural waves instead of fighting them, the vampire haircut might be the answer you’ve been circling around. It’s sharp, dramatic, layered to perfection — and honestly, wavy hair is one of the best textures to carry it. The problem most people run into? They either over-style it into something stiff, or they under-style it and the whole look falls flat. This guide fixes both.
Let’s break it down — what the cut actually is, why it works for waves, and exactly how to style it at home without spending three hours in front of a mirror.
What Exactly Is a Vampire Haircut?
The vampire haircut isn’t just a Halloween thing anymore — it’s a proper salon trend that’s carried into 2026 with serious momentum. At its core, it’s a long, layered cut defined by three things: a pointed V-shape at the back (think widow’s peak, but for your nape), internal layers that create movement without removing bulk, and face-framing pieces that taper into sharp angles around the jaw and collarbone.

The name comes from the silhouette. From the back, that pointed hem echoes the classic vampire collar — sleek, intentional, just a little dramatic. From the front, the layers give you that mysterious fall of hair that never quite sits flat. Sound familiar? That’s because it’s perfect for wavy hair.
Why wavy hair wins here: The vampire cut relies on movement and shadow. Wavy hair creates both naturally. While straight hair needs product to fake the texture, your waves already give the cut its dimension — you’re starting three steps ahead.
You May like: The “Vampire Haircut” is Taking Over 2026: 8 Edgy Ways to Rock Dark Romantic Hair
The Problem with Styling Wavy Hair for This Cut
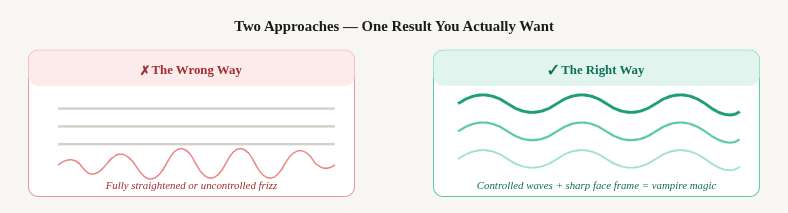
Here’s something most tutorials skip: wavy hair and the vampire cut have one shared enemy — frizz at the wrong places. If your waves go full chaos around the face-framing pieces, the sharp, sculpted lines the cut is built on disappear completely. You end up with a look that feels messy rather than moody.
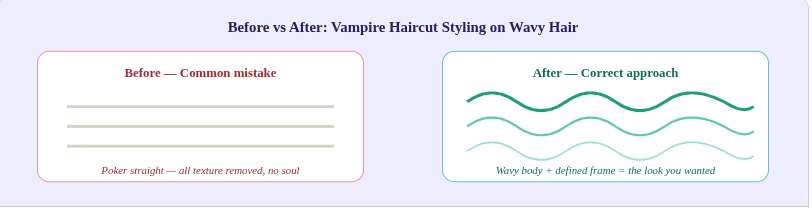
The second problem? Over-straightening. A lot of people see “sharp angles” and assume they need to iron the whole thing poker straight. That’s a mistake. The cut reads better with texture — you just need the right kind of texture. Controlled waves, not reactive frizz.
Once you understand that the goal is controlled definition — not elimination of your natural pattern — the styling process becomes way less stressful.
What You’ll Need Before You Start
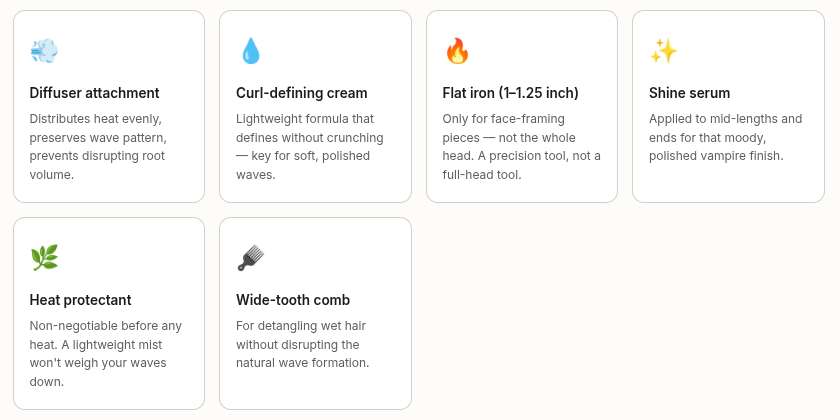
You don’t need a salon’s worth of equipment. But you do need the right things. Here’s what makes a real difference for this specific cut on wavy hair:
- Diffuser attachment – Distributes heat evenly, preserves wave pattern, and prevents disrupting root volume. This is non-negotiable for wavy hair styling.
- Curl-defining cream – A lightweight formula that defines without crunching — key for soft, polished waves that move naturally.
- Flat iron (1 to 1.25 inch) – Only for the face-framing pieces, not for the whole head. Think of it as a precision tool, not a full styling instrument.
- Shine serum – Applied to mid-lengths and ends to give that moody, polished vampire finish. Two drops is usually enough.
- Heat protectant – Non-negotiable before any heat touches your hair. A lightweight mist won’t weigh your waves down.
- Wide-tooth comb – For detangling wet hair without disrupting the natural wave formation before product application.
You May like: Best Baroque Bob Hairstyle Ideas for Thin Hair 2026 — Volume, Drama, and Elegance in One Cut
Step-by-Step — How to Style Your Vampire Haircut
Walk through this once and it becomes muscle memory. The whole process takes about 25 to 35 minutes for medium to long wavy hair.
Step 1: Start with the right wash
Wash with a sulfate-free shampoo. Sulfates strip the natural oils that help wavy hair hold its shape — this matters more than you’d think.
Use a lightweight conditioner from the mid-shaft down. Avoid the roots or you’ll lose the volume the vampire cut depends on at the crown.
Rinse with cool water. Yes, it’s uncomfortable. Yes, it seals the cuticle and gives you that coveted shine.
Step 2: Apply product to soaking wet hair
Flip your hair upside down (seriously, do this — it sets the wave pattern from the root).
Apply curl-defining cream by scrunching from ends upward. Don’t rake it through — that separates the waves into individual strands and creates frizz.
Add 2 to 3 drops of shine serum to your palms, then press (don’t rub) over the top layer only. This is what gives you that glossy, editorial finish.
Timing tip: The “soaking wet” timing matters. If you wait until hair is damp, the product sits on top instead of inside the wave. Apply when water is still visibly dripping for maximum hold without crunch.

Step 3: Diffuse, don’t blow dry
Set your dryer to low or medium heat — never high. High heat disrupts the wave pattern before it can set.
Cup sections of hair in the diffuser and hold for 20 to 25 seconds before moving. The still position is what sets the wave shape.
Work from the nape upward. Leave the top layer for last so it dries over the rest and holds its natural fall.
Stop at around 80% dry. The last 20% air-dries and that’s where your waves find their final shape. Fully blasting until bone dry creates frizz.
Step 4: Shape the face-framing pieces with a flat iron
This is the step most people overthink. You’re not straightening your hair — you’re sharpening the edges. Take the two to three inches of hair that frames your face. Working in small sections (half-inch at a time), run a 1-inch flat iron from the mid-length down. Curve the iron slightly outward at the ends, or inward for a more dramatic frame. The goal is that the face-framing strands look intentional — defined rather than wavy at the front.
Temperature guide for wavy hair:
- Fine wavy hair: 300 to 330°F
- Medium wavy hair: 340 to 360°F
- Thick wavy hair: 370 to 390°F
Going too hot fries the wave pattern in the rest of your hair where the iron gets close.
Step 5: The finishing touches that make it look editorial
Part your hair while it’s still slightly warm. A deep side part elongates the vampire silhouette. A center part gives it a more symmetrical, witchy feel. Both work — pick what flatters your face shape.
Take 2 drops of shine serum and press (don’t rub) over the surface of the waves. This eliminates surface frizz without touching the wave structure underneath.
If any ends feel stringy, very lightly scrunch upward once with dry hands. This re-lifts the wave at the bottom of the cut where the V-shape is most visible.
A light mist of flexible hold spray from 12 inches away locks it without making it crunchy. Don’t use strong-hold spray — it kills the movement.
You May Like: 10 Short Milky Nail Ideas for 2026 That Look Expensive Without Trying
5. Maintaining the Vampire Look Between Washes
Day two and three wavy hair actually works in your favor here. The natural oils add weight that helps the layers fall more dramatically. On non-wash days, flip your hair upside down, shake at the roots to revive volume, then scrunch lightly with a tiny amount of water mixed with a drop of your curl cream. That’s it. Re-flat-ironing your face framing takes under 5 minutes.
For upkeep: this cut needs a trim every 8 to 10 weeks. The pointed V at the back grows out quickly and when it loses its definition, the entire silhouette softens. A sharp back point is what gives the style its identity — don’t let it get rounded.
Weekly care schedule:

- Day 1: Full wash and style (35 min)
- Day 2: Refresh with serum (5 min)
- Day 3: Re-iron face frame pieces (5 min)
- Day 4: Optional co-wash (20 min)
- Day 5–6: Updo or loose refresh (2 min)
- Day 7: Full wash restart (35 min)
6. Common Mistakes to Avoid
Here’s what goes wrong — and how to sidestep it entirely:
- Using too much product upfront. The vampire cut needs visible movement. Heavy product makes waves clump and the layers lose their separation. Start with less than you think you need.
- Touching your hair while it dries. Every touch disrupts the wave formation. The hardest part of this process is also the most important: leave it alone.
- Skipping the cool rinse. It sounds minor but the shine serum only goes so far — a cool rinse does more for gloss than most products you’ll pay for.
- Straightening the whole head. The vampire cut on wavy hair is supposed to have texture in the body — only the face frame should be smoothed. Straightening everything reads as a different style entirely.
- Ignoring the back point. If you can’t see the V-shape, get a hand mirror and check. The nape is where the entire silhouette lives — if it’s grown out and rounded, the look is gone.
Frequently Asked Questions
Can I get a vampire haircut if my waves are loose and fine?
Yes — fine wavy hair actually benefits from the internal layers since the cut removes bulk strategically without thinning the overall appearance. The face-framing pieces photograph beautifully on fine waves. Use a volumizing mousse before diffusing to add body at the roots.
How is a vampire haircut different from a regular layered cut?
The key differences are the pointed V-hem at the back (which a standard layered cut doesn’t have) and the razor-sharp face framing that tapers deliberately rather than blending softly. The vampire cut is more architectural — it has visible structural intention, not just movement.
Does vampire haircut styling work on 2B and 2C curl patterns?
Absolutely. 2B and 2C are arguably the most flattering patterns for this cut. The s-shaped waves fill out the internal layers beautifully and the natural shine of 2C hair pairs perfectly with the moody, polished aesthetic. Stick to curl creams over gels for definition without stiffness.
How do I ask my stylist for a vampire haircut?
Say: “I want a vampire-inspired cut with a pointed V at the back, internal layering for movement, and sharp face-framing pieces that taper toward the collarbone. I’d like to keep my length while removing internal bulk.” Bring a reference photo if possible — it saves the guessing entirely.
Can I style a vampire haircut without any heat tools?
Yes, with a caveat. The body of the style works beautifully heat-free — diffuse on low or air dry and use a good curl cream. The only place heat really earns its keep is on the face-framing sections where you want that defined, sharp edge. You can skip it, but the look will read softer and less structured.
What face shapes work best with the vampire haircut?
The cut is remarkably adaptable. Oval and heart-shaped faces can carry the full look. Round faces benefit from longer face-framing pieces to add verticality. Square faces look great with the soft wave texture balancing the jaw. Wide foreheads can request a soft curtain fringe added to the cut to break up the hairline.
About Vampire Haircut
The vampire haircut for wavy hair isn’t complicated once you stop fighting your texture and start working with it. The waves are the feature — the cut is the frame. Get the right products, follow the diffuse-then-iron approach, and give it one honest try. Chances are, you’ll wonder why you spent so long looking for a different cut when this one was built for your hair type all along.